HTML → Creating an Image Map
Image maps are a combination of HTML code applied to an image, enabling a single image to link to multiple pages based on the position of the cursor over the image.
As we have already learned, a single image can serve as a link simply by placing the image tag in between the opening and closing portions of the link tag as in the following example:
<a href="http://www.yahoo.com"> <img src="../../../images/yahoo.gif" width="243" height="48" alt="yahoo" border="0"> </a>
![]()
But what if we wanted a single image to direct the user to multiple destinations?
Take a look at the yahoo site. Notice the logo at the top of the page with the other images next to it directing the user to the e-mail section, travel, finance and others. While it looks like several separate images it really is a single image supported by the code of an image map.
Before we continue, in Photoshop prepare an image that is 400 pixels wide and 40 pixels high. Name the image - navigation
Still in Photoshop create text on the image so you end up with something similar to my image right below:
![]()
The image is now ready for the code of the image map.
Create the following html pages:
- home.htm
- other.htm
- about.htm
- contact.htm
place a heading in each of the pages to reflect their content .
(i.e. the home.htm page should have the word home encased in an h1 tag)
Using the img tag, code the image so it appears at the top of each of the pages.
Test your pages. At this point they should not link to one another.
Before we add to our code, we need to return one more time to photoshop. In order to code an image map we most first gather the different coordinates of the separate regions within our image.
Any region on the image can be defined by its upper-left and lower-right corners. Each of the corners coordinate will be determined by the value of its x and y coordinates.
Wait, I am not done!
You see, each image in photoshop and on the web is measured by pixels. The upper left corner of an image has the coordinates of zero for the x and zero for the y. This is the orighin point of our image when we wish to measure it.
The lower right corner of an image will have the same value as the image width for its x coordinate while its y coordinate will be equal to its height in pixels.
When we count pixels we go the same direction as when reading any latin language - starting at the upper left corner of the page until we read the last word on the bottom right corner of the page.
Here I have a rectangle that is 400 pixels wide and 400 pixels high. Let us look at few of its coordinates:
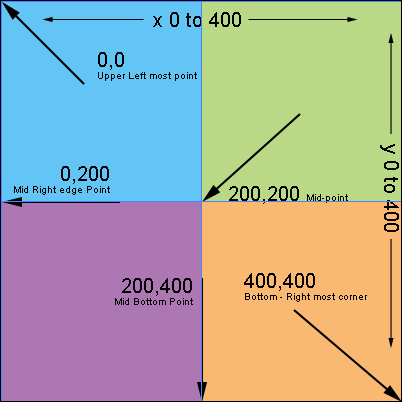
According to the above example, I can define the upper left region of the sequare (light blue) by the following coordinates:
0,0,200,200
x and y coordinates for the upper right corner followed by the x and y coordinates for the bottom left corner of the region.
How would you define the region in the upper right portion (light green) of the image?
remember... upper left corner of the region followed by bottom right corner of the region.
Still not sure?
Try again
Got it?
The upper right region of the sequare (in light green) can be defined by the following values:
200,0,400,200
In photoshop open your image and from the view menu select the rulers option (A checkmark should appear next to the word Rulers) Rulers will appear to the left and above your image.
Right-mouse-click (PC) or Control-Click (Mac) one of the rulers to select pixels as a unit for measurement.
From the window menu select to reveal the info palette.
Place your cursor over the upper left corner of the left most word in your image .
DO NOT MOVE YOUR CURSOR
Notice at the botom right of the info palette - the x,y values of your cursor position appear in the palette.
All the words in the image have are contained within imaginary regions.
![]()
Now it is your turn to do some work. Using the method discussed above find the x,y,x,y coordinates that define the region of the word home.
Do the same with the word other. (You will do the other two words later on.)
write down the coordinates (x and y) of the regions.
This is a good time to take a break.
Open up your home.htm page in your text application.
Right before the closing of the body tag write the following code:
<map name="navbar">
<area shape="rect" coords="x,y,x,y" href="home.htm">
<area shape="rect" coords="x,y,x,y" href="other.htm">
</map>
Here is the explanation:
- <map name="navbar"> - the name of the map is independent. It does not have to reflect the actual name of the image. Remember you are naming the map not the image. Keep the name short and without spaces
- <area shape="rect" coords="12,70,47,105" href="home.htm" alt="home"> - The tag is called area as it states the shape, position and link of the area.
We are defining a rectangular shape. The shape attribute will then be equal to "rect" (Do not spell out the whole word)
coords is short for coordinates. These are the coordinates of the region for the word home. replace the x and y with your coordinates for the home region of the image.
href - like in a link this attribute should specify the link. In this case it would be home.htm - Fix the coords in the second area tag to reflect the region for the word other.
- </map> - Closing the image map portion of the code
We are almost done!
Inside the img tag add the following attribute: usemap="#navbar"
Copy the code of the map and the attribute in the img tag to the rest of your pages.
Your image map should now always link to home.htm and other.htm in all of the pages.
Get the coordinates for the other two about and contact and add the appropriate area tags to your image maps in your pages.
if you followed my example it should all work.
If it does not work, go over the assignment one more time.